- Author Jason Gerald [email protected].
- Public 2023-12-16 10:50.
- Last modified 2025-01-23 12:04.
For more than half a century, the Modern Language Association (MLA) has produced a citation style manual containing guidelines for formatting academic writing and literary works. Widely used in the humanities field, the MLA format is designed to be simple and concise so that it can be used widely. Therefore, the head of the page in the MLA style is also designed in a simple way and only displays the author's last name, as well as the page number on the right margin. You can set it up for word processing programs in a few easy steps.
Step
Method 1 of 3: Recognizing the Basics of Document Head Formatting in MLA Style
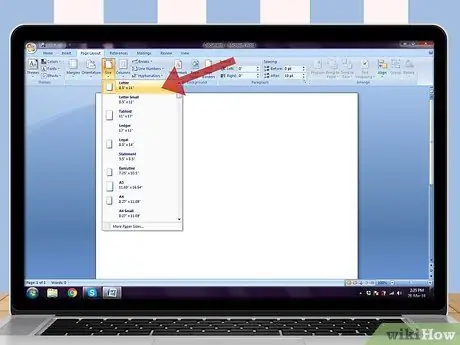
Step 1. Use the right paper
In general, you should use standard 8.5 x 11 inch (or A4) white paper when writing and printing documents in MLA style. Make sure your word processing program is also set to this paper size before you format the header of the document.
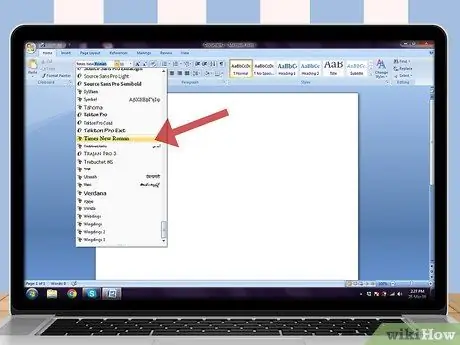
Step 2. Find the right font
The MLA style does not specify one specific font type. However, classic, simple, and easy-to-read fonts are preferable. Times New Roman font can be said to be the right standard choice.
- For the font size, you need to set it to 12 points.
- The same type and size of font needs to be used, both in the head of the document and in the main body of the text. It is not recommended that you use large sizes and complex designs as text titles.
- MLA recommends choosing a font that has a clear distinction between plain text and italic text.
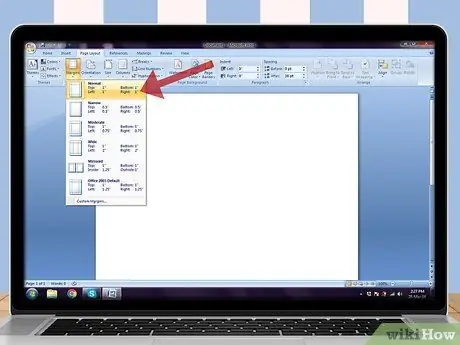
Step 3. Use the right size margins
The MLA style requires margins of 1 inch or 2.5 centimeters on all sides of the page.
Because it needs to be placed in the right margin, page numbers must be one inch or 2.5 cm from the right side of the page. If you use the standard document header and footer settings with these margin guides, the document header text will be about half an inch or 1.25 centimeters from the top of the page
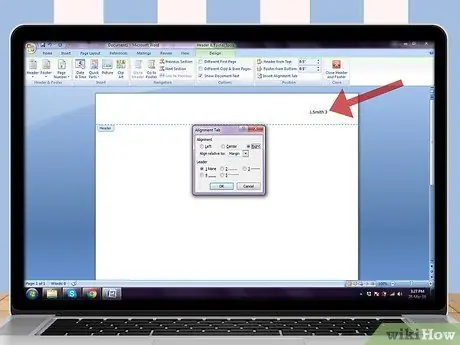
Step 4. Type your last name and page number on the right side of the margin
If your last name is Budianto, the header of the document on the third page will look like this: "Budianto 3" (without the quotes).
- Talk to the teacher if there are other friends/students in the class with the same last name. The teacher may ask you to use, for example, “J. Budianto 3".
- The MLA style also allows teachers or lecturers to assign students not to include their last name in the head of the document, and only to include page numbers.

Step 5. Ask if you are allowed not to add a document header on the first page
The MLA style provides flexibility for lecturers/editors/writers to include the head on the first page or not.
- The title page is not used in MLA format so your full name should already be listed on the first page.
- Just ask your teacher/lecturer about their preferences.
Method 2 of 3: Creating a Document Header in MLA Style in Microsoft Word
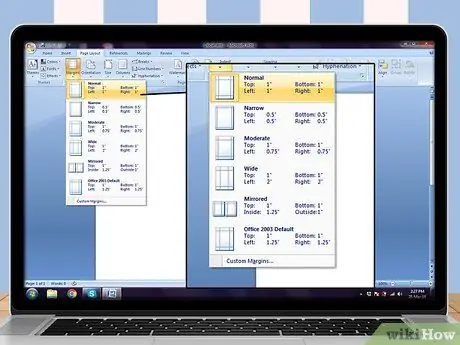
Step 1. Check the document's margins and settings first
Regardless of the version of Word used, margins and settings will make the process of creating document headers easier.
- Choose a margin of 1 inch or 2.54 cm. Also, choose a commonly used font such as Times New Roman with a size of 12 points. Finally, use double spacing for the entire document.
- There are slight differences in the process for changing these aspects in different versions of Word, but any changes can be made using the tabs labeled at the top of the document.
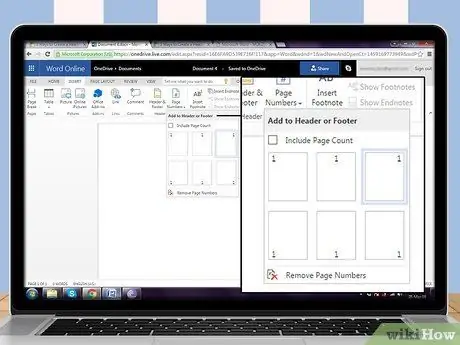
Step 2. Create the document header in MLA format in Word 365
This program is a generic web-based version of the word processing program Word.
- Click the “Insert” tab at the top of the page.
- Click the “Page Numbers” button. A drop-down menu will appear with the option to add a header or footer to the document ("Add to Header or Footer").
- Select the option to add page numbers in the top right corner of the page.
- The page number entered will be blurred. Type in your last name and add a space. Mark the name and page number, then change the font to Times New Roman with 12 point size (if not already).
- Click the blurry area below the document head to return to the main body of the document. The header of the completed document will be hidden.
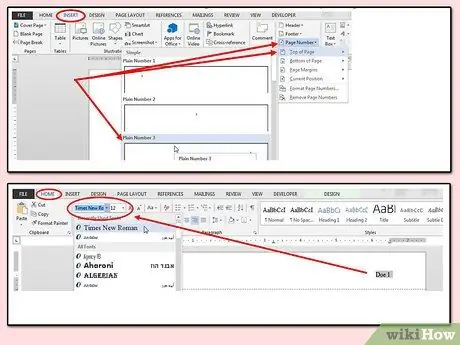
Step 3. Create the document header in MLA format in Word 2013
Word 2013 is the latest full-featured version of Word that is fully functional.
- In addition to the directions in this step, you can also follow the next steps for Word 2007 and 2010. Images and some small details may look different in Word 2013, but the process is basically the same.
- Click the “Insert” tab at the top of the page.
- Click the “Page Number” button. A drop-down menu will be displayed.
- Select "Top of Page", then click "Plain Header 3" as the document header format option.
- Page numbers will be displayed and blurred. Type in your last name and insert a space. Mark the name and page number, then change the font to Times New Roman at 12 point size if not already.
- Click the text area below the dotted line to return to access the main body of text.
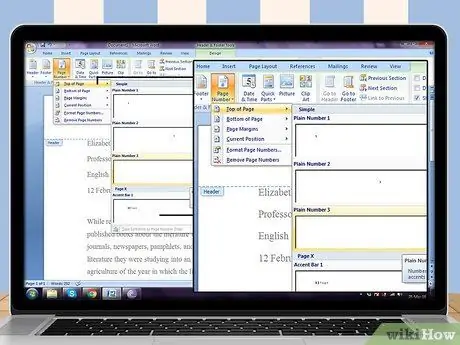
Step 4. Create the document header in MLA style in Word 2007 or 2010
The steps in this segment refer specifically to earlier versions of Word, but are still widely used.
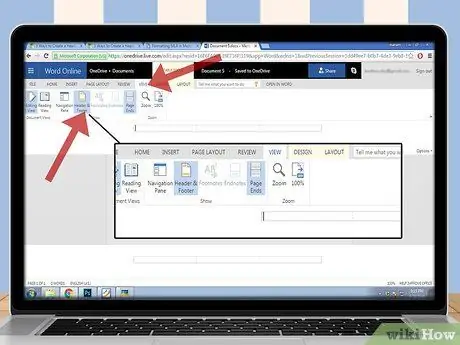
Step 5. Open the document header from the menu at the top of the program window
The document header is not automatically visible on a blank document, unless you are in Print View mode.
In Microsoft Word, the “Header and Footer” option is on the “View” menu. While there are options for adding images, symbols, and the like, keep in mind that in MLA format, you can only use text (your last name) and page numbers
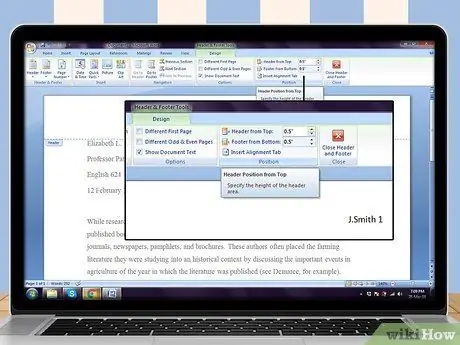
Step 6. Click the document header segment when it displays
Set the header to display in the top-right corner of the page, about half an inch (1.25 cm) from the top of the page and the corner of the right margin.
You can adjust the document header by selecting it from the pop-up menu options or via the alignment options to select the right alignment
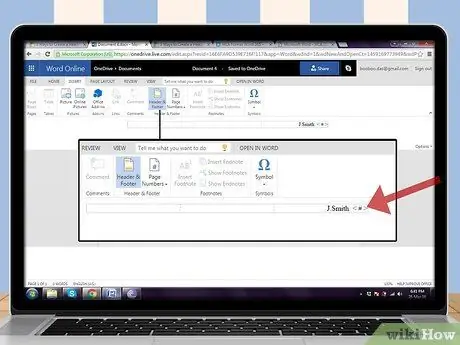
Step 7. Enter the page number
Select the “Insert” menu and click “Page Numbers”. Specify the position, format, and alignment of the page numbers from the menu.
- Once displayed, the page number will be blurred and the cursor will appear on its left side. Just type in your last name and insert a space between the name and the page number.
- As allowed in the MLA style, the lecturer or teacher may prefer not to have page numbers added to the first page. There is an optional box in the “Page Numbers” menu to determine whether the number “1” should be displayed on the first page or not.

Step 8. Save changes
The last name and page number will be displayed sequentially on each page that is used as you type the document.
Move the cursor to the space outside the document head area. Now, you can get back to writing the document
Method 3 of 3: Creating a Document Header in MLA Style in Google Docs
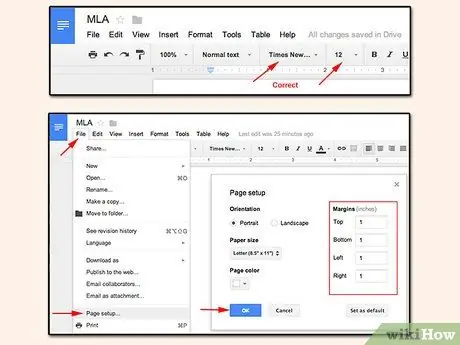
Step 1. Determine the base format
Google Docs uses the 11-point Arial font as the default font. You will need to resize it to 12 points to meet the MLA style formatting requirements, as well as switch to the Times New Roman font.
- One-inch (2.5 cm) margins are set as the Google Docs standard, and this option complies with MLA style requirements.
- Duplicate the document spacing using the line spacing button at the top of the document.
Step 2. Find the right template
You can apply MLA styles to the entire document, including the document header before starting to select a template.
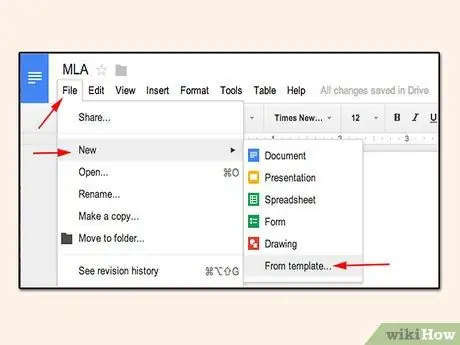
- Click the “File” tab, then select “New” from the drop-down menu.
- Click "From Template". After that, you will be taken to a new tab with various template options.
- Find and select “Report (MLA)”. The new document will open with a bookmark or text field in the appropriate MLA format.
- The page numbers are set in the proper format, but you can't see the option/last name column next to them (as allowed in MLA style). To add a name, click “View and Print Layout” if the document header is not visible. After that, click the number "1" in the header and type in your last name, then insert a space.
Step 3. Format the document header manually
If you don't want to use a template or just want to apply the MLA style to the document header, you can easily customize the document header yourself.
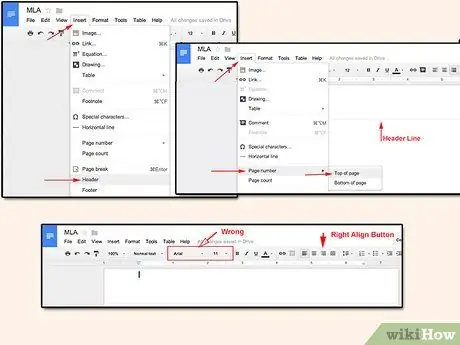
- Click the “Insert” tab, then select “Header” from the drop-down menu.
- Change the font size to 12 points and the font type to Times New Roman (if desired) using the buttons above the document.
- Align the head in the right margin by pressing the “Right Align” button (marked by the right aligned text symbol) above the document.
- Type the last name and insert a space. Press the “Insert” tab, then select “Page Number” from the drop-down menu. Select the “Top of Page” option. Your document header is now properly formatted.
Tips
- To add a document header to Apple's Pages program, click the “View” menu in the horizontal toolbar at the top of the window. Select "Show Layout". Now, you can see the head and feet in the document. Type in the last name and go to the “Insert” menu at the top of the window. Select "Auto Page Numbers". Click "Hide Layout" when done.
- If you have a number of research articles or academic texts to write, save the MLA-formatted document as an academic article template on your computer. Start writing each article using this document and click " Save as " (instead of " Save ") to keep the template from changing.
- While you can create document headers in MLA style in Apple's built-in TextEdit, adding headers is done using presets or templates for page numbers and document titles so they won't be displayed in MLA format. To print the document header in TextEdit, click "File" and select "Show Properties". Type in your last name as a title. When ready to print the document, click "File" and select "Print". Click the drop-out menu and select the box labeled "Print Header and Footer".


