- Author Jason Gerald gerald@how-what-advice.com.
- Public 2023-12-16 10:50.
- Last modified 2025-01-23 12:04.
Anime is a popular style of animation and drawing that originated in Japan. Drawing anime characters can seem difficult, especially if you see your favorite anime made professionally. Luckily, anyone can learn to draw anime characters, and the process is pretty simple if you break it down into small steps.
Step
Method 1 of 2: Drawing the Head and Face of an Anime Character
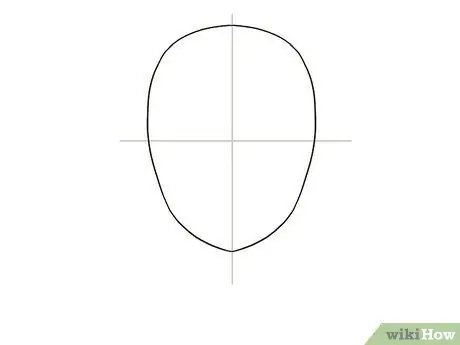
Step 1. Draw an oval and divide it into 4 parts
This is the basic outline of the anime character's head. the proportions don't have to be exact, but make an oval that narrows at the bottom to become the chin. After drawing the oval, draw a horizontal line through the center. Then, draw a vertical line through the center that intersects the horizontal line. Later, you'll use these lines as guides for drawing the character's facial features.
If you want to create a character that has a wide face, slightly widen the bottom of the oval so that it's just a little narrower than the top. If you want your character to have a slim face, make the bottom of the oval much narrower than the top. Anime characters don't use just one head shape so you can experiment to your heart's content
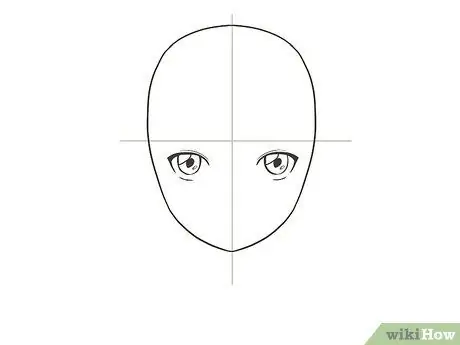
Step 2. Draw the eye under the horizontal line
Anime characters' eyes are large and exaggerated, and usually take up about 1/4 to 1/5 the height of the face. To draw anime eyes, start by drawing thick upper eyelashes just below the horizontal line drawn, and on one side of the vertical line. Then, draw a semi-circle that goes down from the top lash, and create a black pupil in the center. Next, draw a horizontal line under the semi-circle as the lower lashes. Finally, shadow inside the circle, around the pupil, and leave a little space so that it looks like it's reflecting light. Do the same on the other side of the vertical line to create the second eye.
Tip:
Adjust the shape and size of the eyes depending on whether you are depicting a masculine or feminine anime character. For a feminine character, make the eyes taller and rounder, and apply some thick eyelashes at the top of the eyes. For a masculine character, make the eyes shorter and smaller.
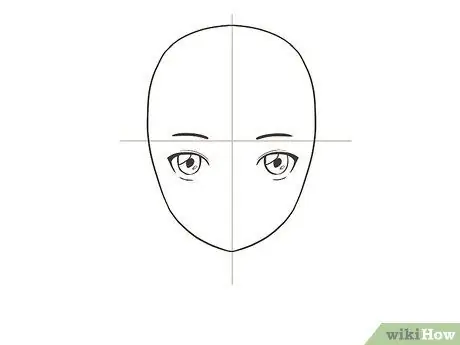
Step 3. Draw eyebrows above the horizontal line
Draw a long, descending curved line for each eyebrow. Make it slightly longer than the upper lash line you drew for the eye. Then, thicken the tip of the eyebrow in the middle of the face.
If you're drawing a girly anime character, make the eyebrows quite thin. For masculine characters, thicken the eyebrows so that they are more conspicuous on the face
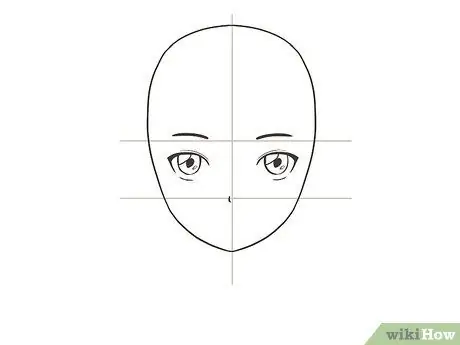
Step 4. Add the nose between the horizontal line and the chin
The nose of the anime character is quite faint, and is only visible when looking at the character from the side. To draw an anime character's nose, draw a short, simple vertical line along the center of the face at the midpoint between the horizontal line and the chin. Make the line longer if you want the character's nose to appear bigger.
- Make the nose the smallest feature on the character's face.
- The nose will overlap the vertical line you drew. To see it more clearly, make it darker than the vertical line, or erase the vertical line around the nose.
- Masculine anime characters sometimes have noses that appear more conspicuous, but not always. If you want your character's nose to appear more prominent, draw a horizontal line below the vertical line as the bottom of the character's nose. Also, create a triangular shadow next to the nose so it looks like the light is coming from the side of the character.
- For certain anime styles, for example chibi, you don't even need to draw a nose!
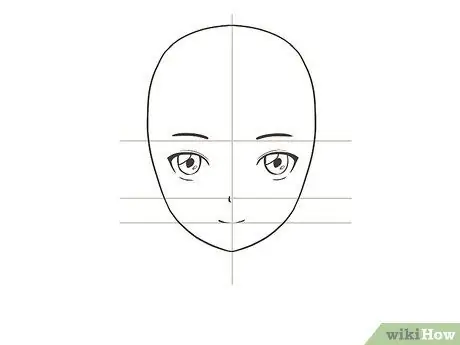
Step 5. Draw the mouth about halfway between the nose and chin
Similar to noses, anime character's mouths are usually simple and sketchy. To draw the mouth, draw a horizontal line approximately the same length as the eyes. You don't need to make lips. Make the mouth the second smallest feature on an anime character's face, after the nose.
- Curl your mouth line up if you want your character to smile, or down if you want to appear disappointed.
- If you want your character to smile and show their teeth, draw an upward curved line below the horizontal line created as the mouth. The white space between the curved line and the horizontal line should be half the length of the mouth. This space will be the character's gear.
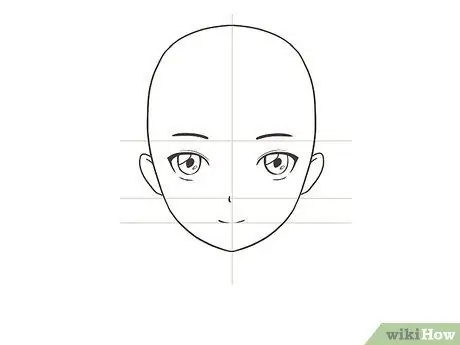
Step 6. Add the ears to the side of the head
If you want your character to have hair covering their ears, skip this step. However, if the character is going to have short hair, draw narrow ovals on each side of the head. Make the tops of the ears parallel to the horizontal line through the center of the face, and the bottoms in line with the bottom of the nose. After that, make ear holes inside each oval.
Experiment with the size of the character's ears if you want to make them bigger or smaller
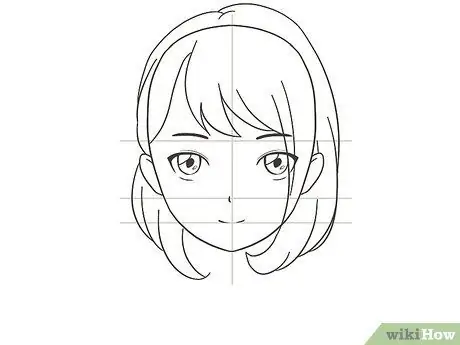
Step 7. Draw the hair on the character's head
The hairstyle you choose is up to you, but anime hair usually has pointed ends and clear sections. You can draw short, cropped, medium, or long wavy hair styles. Whatever hairstyle you choose, don't draw every strand of hair. Instead, create large sections of hair, such as 4-5 sections that taper at the ends.
- If the character has long hair, draw 2 ponytails, one on each side of the head with a pointed tip. You can also draw her hair pulled into a bun on top. In addition, you can also depict the bangs by making 3-4 sections of hair that come down from the forehead.
- For a shorter hairstyle, you can depict 3-4 distinct sections of hair that are sideways on the character's forehead. You can also make a hairdo without bangs and draw a few lines from the hairline to the back of the head so it looks like it's slicked back. Otherwise, you can depict a bob hairstyle all the way to the chin which is divided into thick sections.
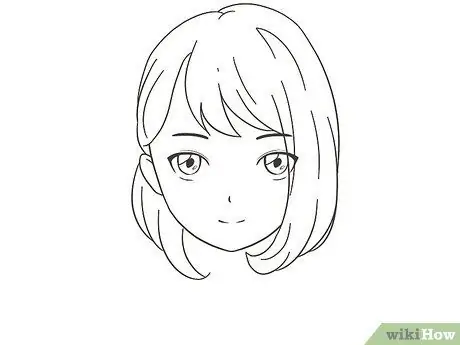
Step 8. Erase the drawn horizontal and vertical guide lines
Remove it carefully so you don't make a mistake.
Once you've erased both lines, the character's head and face are done
Method 2 of 2: Drawing Anime Character Body
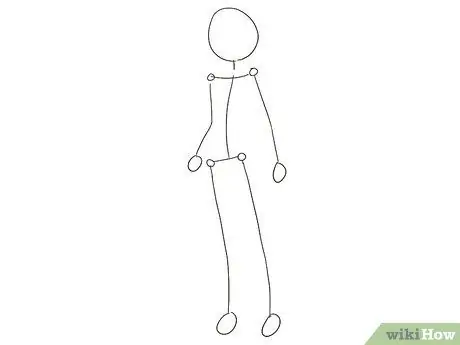
Step 1. Draw the stick figure as the outline of the character's body
Draw straight lines for the arms, torso, and legs of the character. The character's arms and torso are roughly the same length, and the legs are about times longer. Then, draw triangles or ovals as the palms and feet. Make the hands about the length of the arms, and make the soles of the feet about the lengths of the feet.
- To keep the proportions right, create a stick figurehead about 7 times the length of the character's head.
- The arm line should start at about 1/5 of the top end of the torso line.
- Get the stick figure character into the posture you want. For example, if your character is sitting, draw his legs bent. If you want your character to wave, make their arms bent.
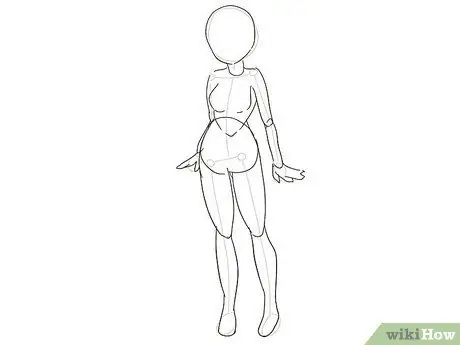
Step 2. Outline the character's body
Draw outlines around the stick figurehead beforehand producing a rough sketch of the character's torso, arms, pelvis, and legs. This outline doesn't have to be accurate for now. At this point, you just need to create the basic shapes of all of the character's body parts.
- Draw ovals for the upper and lower arms, as well as the legs. Then draw circles on each knee and elbow joints. In proportion, the upper and lower arms have the same length and size. Make the upper leg thicker than the lower leg.
- For the torso, draw a rectangle that is wider at the top and narrow at the bottom. In the end, the wide corner at the top will become the character's shoulders.
- To outline the pelvis, make an oval where the torso and upper leg meet.
- Anime characters tend to be tall and skinny, but you can experiment with different heights and body shapes!
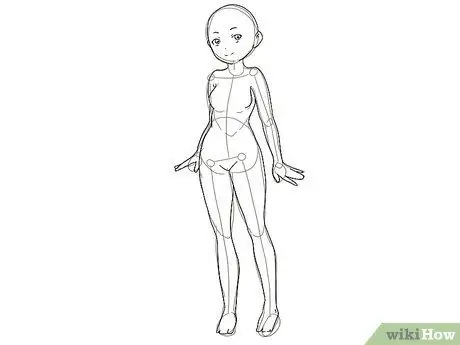
Step 3. Connect and define the outline created
Trace the outer edges of the character's body resulting in a smooth outline. At this point, start tidying up various parts of the character's body to make it more realistic, such as the character's hands, shoulders, hips, and neck. When you're done, you'll have a full, detailed outline of the character's body around the previous, more abstract outline.
- To connect and tidy up the character's legs, (ovals for the upper and lower legs, circles for the knees, and shapes drawn as the soles of the feet) so that you get a neat outline for each leg. Make the outline as smooth as possible (without gaps) to make it look realistic.
- For the upper body, do the same with the arms and torso. Blunt the corners of the torso to form the shoulders, and draw 2 curved lines going up in the middle of the torso as the neck. Additionally, connect the shape drawn as the pelvis to the torso and upper leg.
Tip:
If you're drawing a masculine anime character, widen your chest, hips, and shoulders. If you are drawing a girly anime character, narrow your shoulders, widen your hips, and create breasts. In addition, arch the waist inward so that it looks narrower.
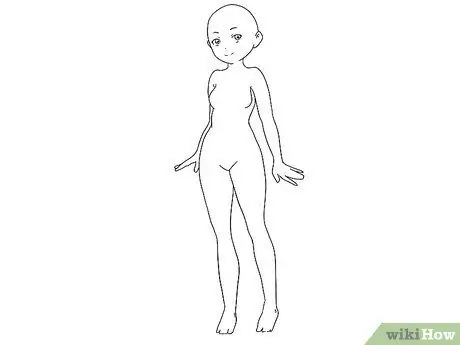
Step 4. Erase the stick figures and shapes drawn earlier
Be careful when erasing so you don't damage the finished outline. When you're done, all that's left is a neat outline of your character's body with no auxiliary lines in it.
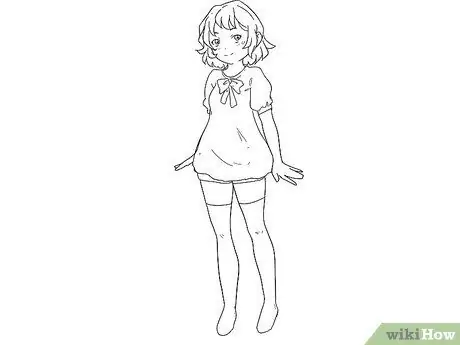
Step 5. Add anime character outfits
Clothing is depicted outside the outline of the character's body. For example, for a shirt, draw the sleeves on the character's sleeves, and the shirt body on the torso. Then, erase the outline of the body in the clothes because that part of the body should be covered by the clothes. For example, if your character is wearing shorts, erase the outline of the body inside the pants because the legs shouldn't be visible.
- When drawing clothes, think about the areas where the clothes shrivel and fold naturally so they look more realistic. You can also look at pictures of clothes on the internet and notice the parts and the way they are wrinkled.
- You are free to choose the type of clothing for the anime character. Some of the common clothes worn by anime characters are school uniforms, formal clothes, and traditional Japanese clothes.


