- Author Jason Gerald gerald@how-what-advice.com.
- Public 2023-12-16 10:50.
- Last modified 2025-06-01 06:05.
Admit it, your cell phone ringtone is boring. Who wants to hear the three-tone bell ring over and over again? Add jazz music to your phone (or rock, hip-hop or classical music…) and set yourself apart. Follow this guide to learn how to give your phone a distinctive sound all its own.
Step
Method 1 of 4: Using an Online Service

Step 1. Visit one of the online ringtone generators
There are thousands of websites that allow you to upload a music file and then choose which part of the file you want to turn into your ringtone. And the best part is that these websites are all free! Popular sites include:
- MakeOwnRingtone
- Myxer
- Mobile17
- Audiko
- Song Cutter

Step 2. Upload the song from which the ringtone will be created
You can select files from anywhere on your computer and some services allow you to connect to files in cloud storage. Most services accept all major file formats, including:
- MP3
- AAC
- M4A
- WAV
- WMA

Step 3. Set the ringtone segment
Once the file has finished uploading, you'll be able to decide which part of the song you want to use as your ringtone. Most cell phones support ringtones up to 30 seconds long.

Step 4. Choose the bitrate you want
Most ringtone makers will default to a lower bitrate than a standard audio file, because the loudspeakers on a cell phone are generally of lower quality than headphones or stereo speakers. This allows the file to be smaller in size, although still of fairly good quality.
Mostly the default is 96 kbps, and can be increased if you wish. 320 kbps is CD quality

Step 5. Choose the type of format you want
iPhone ringtones must be in the M4R format, whereas most other cell phones support the MP3 file format.

Step 6. Decide how you want to receive a file
Most services offer several options, namely downloading the file to your computer, receiving it by email or having the file sent directly to your phone.

Step 7. Place the file on your phone
If you got the file by sending it directly to your phone, then you should be able to select the ringtone in your ringtone menu. If you downloaded it to your computer, you'll need to place it in the proper directory on your phone:
- For iPhone, place the M4R file in the Ringtones library, in iTunes. Sync the library with your phone and your ringtone will be added to the ringtone list.
- For Android, connect your phone to your computer. Open the phone drive and navigate to the “media” folder. Open the “audio” folder, or create a new one if it doesn't exist. Finally, open the “ringtones” folder or create a new one. Place the audio file in the “ringtones” folder.
Method 2 of 4: Using an App

Step 1. Download the app of your choice
Both iOS and Android operating systems have many options available for ringtone maker apps, both free and paid from their respective stores. Read user reviews to determine which app is best for you. Two of the best free apps are:
- Create Ringtones! - iOS
- Ringtone Maker - Android

Step 2. Load a song in the app
The method varies from one application to another, but generally you can load any song stored on your phone. These applications usually support all the major file formats.

Step 3. Set your ringtone segment
Once the song is loaded, you will be able to set the start point and end point of the ringtone. You also have the option to add audio effects such as fade in and fade out. Make sure that the start and end points do not suddenly start or stop, so that your ringtone will sound as good as possible.

Step 4. Save the new ringtone to your phone
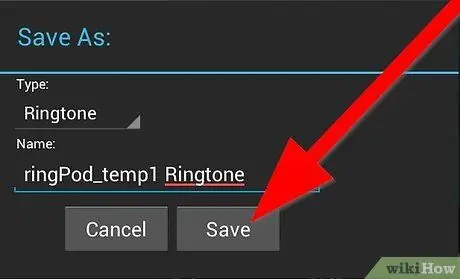
Android apps will automatically place the ringtone in the right folder. Just click the Save or Set button and your ringtone will be added.
For iOS, you will need to connect your phone to your computer and launch iTunes. The ringtone file will appear in the File Sharing section of the Apps tab. Save the file to your computer and then drag it back into the Ringtones library in iTunes. Resync your phone and your ringtone will be available, ready to go
Method 3 of 4: Using iTunes
Step 1. Launch iTunes
This example will focus on how to use parts of a song to create a ringtone, but you can use any audio file to create one. Import the song into iTunes by right-clicking on the file and selecting "Open with… iTunes."


Step 2. Select the file you want to use for your ringtone
You can choose any song that is in your library. Play the song and be prepared to note when you want the ringtone to start and end. iPhones support ringtones up to 30 seconds long.
Make a note of the minutes and seconds you want the ringtone to start and end

Step 3. Change the Start Time and Stop Time
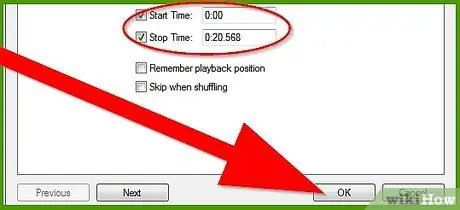
Right-click on the file and select Get Info. Select the Options tab. You can enter new values for Start Time and Stop Time. Select the section you want (use a period between minutes and seconds), and click OK.
Step 4. Separate this new chunk from the original file
To do this, right-click again on the song and select Create AAC version. You should now have two copies of the song, but with different durations. The shorter one will be your ringtone.

Once you've created the AAC version, click on the original song, select Get Info and return to the options screen. Reset the file to play the entire song by setting the Start Time to 0 and unchecking End Time
Step 5. Right-click on the ringtone file and select View in Finder (or Show in Windows Explorer)
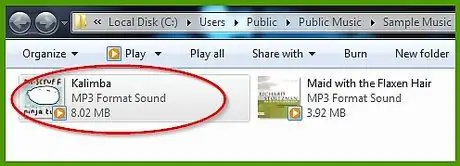
A new window containing both your ringtone file and the original should appear.

Step 6. Change the ringtone to the proper format
If you are using an iPhone, the ringtone must be in M4R format. Right-click and select Rename (Windows), or press and hold Shift, then click on the file (Mac). Just change the "a" (for audio) at the end to "r" (for ringtone).

- On a Mac, when the dialog box pops up to confirm, click "Use.m4r".
- On the PC, when the dialog box appears confirming, click "Yes" to rename the file.
Step 7. Delete the AAC version of the file, from iTunes
Go back to iTunes and delete the shorter file. Don't delete the original. When the dialog box appears, click "Keep File."

On a PC, deleting the original files won't be a problem. This will not delete the.m4r file from your computer

Step 8. Place the M4R file back in iTunes
Return to the Finder or Windows Explorer window and drag the M4R file into the Ringtones library in iTunes. This needs to be done for the iPhone.
Once the file is placed in the Ringtones library, you can sync your phone to add it to your list of available ringtones
Method 4 of 4: Using Audacity

Step 1. Download Audacity
Audacity is an open source audio editing program that can be downloaded for free directly from the developer. You will be able to use this program to separate segments of a song that you want to turn into a ringtone. This is a powerful program and you will likely find many other uses besides creating ringtones.
Step 2. Download LAME
Despite the somewhat annoying name, this software actually allows you to export files in MP3 format. LAME is available for free from its developers.


Step 3. Select a song that you want to use as a ringtone
To edit in Audacity, the song must be in MP3 format. If the song isn't in MP3 format, you can convert it using a variety of free online music converters. Just upload the file and select MP3 as the output format.
Step 4. Open the file in Audacity
When the MP3 is loaded, you will see a graph of the audio waveform. You can press the Play button to listen to the song and a marker will show you where in the song you are.

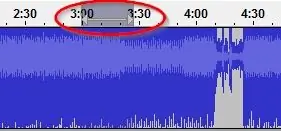
Step 5. Highlight the part you want to turn into a ringtone
Use your mouse to highlight the part you want to change. You can press the Play button to make sure the start and end sound good and don't break suddenly.

Keep your segment under 30 seconds, or some phones may not support it
Step 6. Export the segment
Once you are satisfied with your selection, click File and then click “Export Selection”. Select PM3 as the format and give the file a name. You will need to reload the LAME file that you downloaded earlier.


Step 7. Place the ringtone on your phone
For Android, connect your phone to your computer via USB and place the ringtone in the /media/audio/ringtones/ folder. For iPhone, adding files is done through a step-by-step process:
- First, add the clip to your iTunes library. Right-click on the clip and select “Create AAC version”. This will create a new file in M4A format.
- Right-click on the new file and select View in Finder or Show in Windows Explorer. This will open the folder containing the file. Rename the file so that it is in the M4R format instead of M4A.
- Drag the newly renamed file back into iTunes, this time into your Ringtones library. This file will be added to your iPhone the next time you sync.
Tips
- Make sure the ringtone is 30 seconds or less.
- This is legal to do as long as you do not distribute the music to other parties.


