- Author Jason Gerald gerald@how-what-advice.com.
- Public 2024-01-31 09:30.
- Last modified 2025-06-01 06:05.
GIMP (GNU Image Manipulation Program) is a free download and widely used image editing program. For both professionals and casual users, GIMP is a powerful tool. However, to be able to use most of the most useful functions in this program requires some serious learning effort, especially for people who are not familiar with the application. Creating transparent images using GIMP is a fairly simple process that, if mastered, can open up a number of artistic opportunities for the user. Take a look at step 1 below to get started.
Step
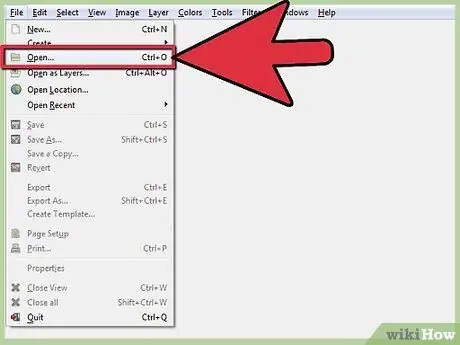
Step 1. Open your image in GIMP
Launch the GIMP application and view your image by selecting File > Open … from the taskbar at the top of the GIMP window, then locate your image. Once you select the desired image, it will load in the central editing window, and by default two smaller windows will also open, namely the “Toolbox” window on the left and the “Dialogs” window on the right. Keep an eye on these side windows as they contain the tools we will use to make the image transparent.
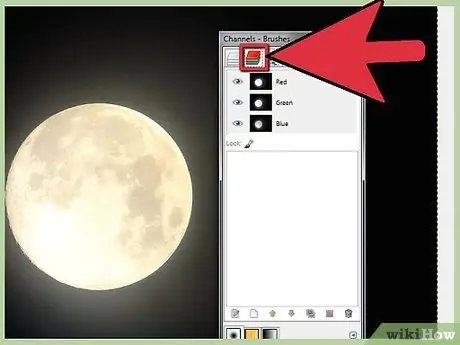
Step 2. Check if your image has Alpha channel (transparent background added on certain layers)
In GIMP, “Channels” differ from standard “Layers” in that channels contain all of the image's graphic data for a given color. In other words, in GIMP, the image color by default has three channels: Red, Green and Blue. Black and white images have only one channel: Gray. In addition, some channels have an additional channel called “Alpha channel”. This alpha channel is what we will manipulate to create transparency in our image. Take a look at the instructions below to see if your image has an Alpha channel.
- First, select Windows > Dockable Dialogs > Channels from the menu at the top of the central editing window.
- You'll see tabs labeled with overlapping red, green and blue squares appear in the Dialogs window on the right. If it's not already selected, click this tab.
- You'll see entries for the “Red”, “Green” and “Blue” channels at the top of this tab (or if the image is black and white, a single “Gray” channel). Below that, you may or may not see the Alpha channel. If you don't see it, add it to your image with the following steps. If you see it, skip the following steps.
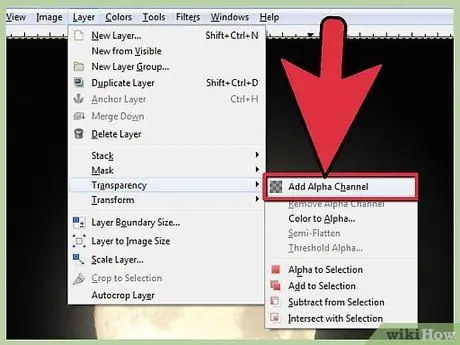
Step 3. If necessary, add an Alpha channel
If your image doesn't have an Alpha channel, don't worry - it's easy to add one. Just select Layer > Transparency > Add Alpha channel from the menu bar at the top of the central editing window. This step will display the Alpha channel, which you will use to make the image transparent.
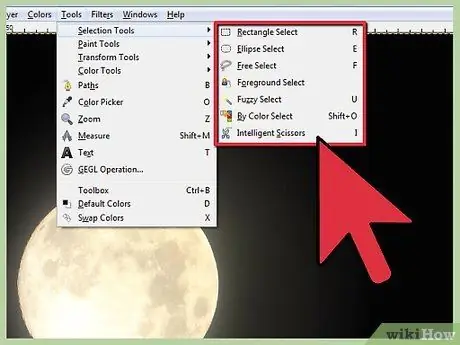
Step 4. Choose the Selection Tools
At the very top of the Toolbox window (by default, it's to the left of the editing window) are tools for selecting different parts of your image. In the following steps, we will use one of them, “Fuzzy Select Tool”, to select the part of the image that we want to make transparent. However, in different situations, other selection tools may be more suitable. The first seven tools at the top of the Toolbox window are all selection tools. In order from top left, the tools are:
- "Rectangle Select Tool". This tool makes a selection of rectangular objects in your image.
- "Ellipse Select Tool". This tool makes a selection of oval or oval shaped objects in your image.
- Free Select Tools". This tool allows you to make freely desired selections on the image using the mouse - perfect for small and oddly shaped image pieces.
- "Fuzzy Select Tool". This is the tool we'll be using in this guide. This tool intelligently makes image selections that it recognizes as distinct objects from the rest of the image. For example, if one part of your image has a different color than the rest of the image and you click on that part of the image with the “Fuzzy Select Tool”, GIMP will try to extract that particular part of the image and that's it.
- "Select by Color Tool". This tool lets you select all areas in the image that have the same color.
- "Scissors Select Tool". This tool uses edge-fitting capabilities to intelligently select images.
- "Foreground Select Tool". This tool attempts to retrieve objects in the image that GIMP identifies as objects in the foreground.
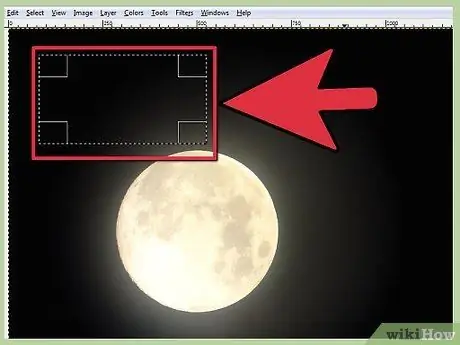
Step 5. Select a part of your image
For this step, we will assume you are using the “Fuzzy Select Tool”, although any of the above selection tools is fine. Click the “Fuzzy Select Tool” icon in the Toolbox window (which is shaped like a magic wand), then click the part of the image you want to make transparent (for example, the background). GIMP will try to extract this part of the image - you will see a dotted line around the image you clicked on.
-
If this dotted line doesn't cover the right area, you may need to adjust the sensitivity of the selection tool. After clicking the “Fuzzy Select Tool”, you will see, one of them, a small meter that says “Threshold” at the bottom of the Toolbox window. By setting this meter, you can change the sensitivity of the “Fuzzy Select Tool” - in other words, how easily the “Fuzzy Select Tool” distinguishes objects in the image.
In general, for images with a small color range or black and white images, setting a lower “threshold” is better, while a higher “threshold” is more suitable for images with a large color range. Experiment to find the right sensitivity for your needs
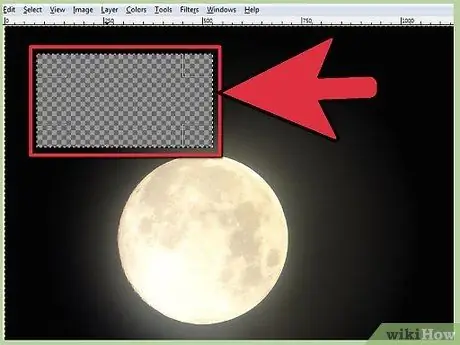
Step 6. For total transparency, press “Delete”
If you want part of your selected image to be 100% transparent, you can simply delete it. With the presence of the Alpha channel, the part of the image that contains nothing will become completely transparent. After removing part of the image, you will see a checkerboard background - this indicates transparency.
Make sure you check carefully your image after making some parts transparent, especially if you use the “Fuzzy Select Tool”. Small bits of your image may remain, especially on the border between two objects. You may need to enlarge the image and use the “Eraser Tool” to enhance your work
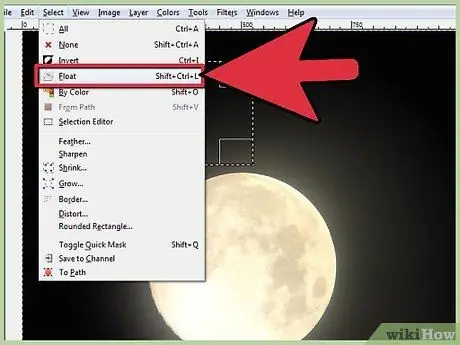
Step 7. For partial transparency, use one of several options
Let's say you don't want the part of the image that you have selected to be 100% transparent. Say, for example, you only want that part of the image to be 50% transparent. Fortunately, GIMP offers a variety of partial transparency options, which range from very basic to somewhat complex. Three general options that can handle most situations of this kind are listed below - choose the one that's right for you:
- Use the "Eraser Tool". Select the “Eraser Tool” from the Toolbox window. You will see the “Opacity” meter appear below. By setting the opacity to a level below 100%, you can use the “Eraser Tool” to “paint” parts of the image with partial transparency.
- Make the entire layer partially transparent. Open the “Layers” tab in the Dialogs window (by default, this is the first tab). At the top, you will see a list of layers in your image. Select the layer you want, then adjust the opacity meter at the top of the tabs until you get the level of transparency you want.
-
Use floating selection. Using any of the selection tools listed above, select a part of the image. Once the section is selected, click Select > Float from the menu bar at the top of the editing window. This will create a floating selection - essentially it's a temporary layer that you can edit on the fly. If you don't see it yet, go to the “Layers” tab of the Dialogs window - you will see a new temporary layer. Select this layer and set the opacity level to your liking. Once you're happy with the result, click the image anywhere outside the selection - your cursor will have an anchor next to it. By clicking on the anchor, you are “anchoring” the floating selection, while applying the changes you made to the image and removing the temporary layer.
If you're having trouble, try making sure that the Alpha channel is highlighted on the “Channels” tab of the Dialogs window before continuing through the whole process
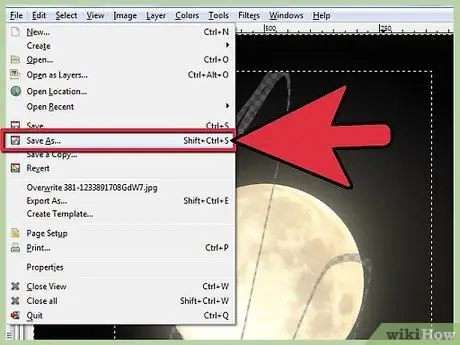
Step 8. Once done, save or export the image as a GIF or-p.webp" />
Both.gif and-p.webp


